


Spring and the brightest and most joyful Christian holiday are approaching. Needlewomen take up crocheting for Easter. This exciting activity will last more than one evening, and the variety of options is amazing.
Simple egg
Do you want to give an unusual gift? Your loved ones will definitely be surprised by crocheted items. First, let's look at the simplest ones. For work, we will take threads with a density of 50 g per 133 meters and a hook size 3.5. You will also need filler.
- 1st row: make 7 stitches in a loop and tighten it into a circle.
- Row 2: knit 2 from each stitch.
- Row 3: Simply knit each stitch.
- Row 4: increments must be made through 1 stitch.
- Row 5: knit all stitches.
- Row 6: add through 2 stitches.
- Rows 7-12: knit.
- Row 13: decrease every 5 stitches.
- Row 14: knit as is.
- Row 15: decrease through 2 stitches.
- Row 16: decrease through 1 stitch.
- Row 17: make decreases and fill the egg.
- 18 and further: we decrease until the hole is closed.
The egg is ready. This simple scheme is suitable for those who are just taking their first lessons. simple, and there are many similar schemes in open sources.
Variations
Crocheting for Easter doesn't have to be boring. Even a simple egg can be turned into a real masterpiece. Create pieces in different colors that coordinate with each other. They can become an indispensable interior decoration for the holiday or a nice gift. Take fancy yarn “grass”, bouclé or a simple one, but with sectional dyeing. By interspersing multi-colored pieces of thread, you will get stripes or spots. Show your imagination and a funny picture will appear on the egg.
Satin ribbons and lace are perfect for decorating the finished work. Rhinestones or a small scattering of beads will add shine and charm. All you have to do is glue on the eyes and embroider the mouth - and this is a character come to life. You can actively involve children in the production and design. They will definitely enjoy working with their mother and feeling involved in the holiday bustle.

Openwork cover
This cover can be put on an artificial egg, but it will also work for a real boiled egg. And after the holiday it can be postponed until next year. This Easter crochet is thinner, you will need cotton threads and a 1.5 hook.
- 1st row: connect 10 air loops into a ring.
- 2nd row: we tie the resulting circle with 14 stitches.
- 3rd row: make 10 loops in a chain, then double crochet, then another 5 loops in a chain. Do this until the row is completed, and then you need to make 4 air loops and complete
- Row 4: We knit 5 stitches into the resulting arch, and from each loop of the bottom row we make an increase.
- 5th row: 4 lifting loops, then double crochet alternates with 2 chain loops.
- Row 6: 14 chain stitches, stitch over 2 double crochets, repeat alternating until the end of the row. Here you can adjust the size; if the egg is small, knit fewer air loops.
- Row 7: make arches from 10 air loops.
- 8th row: arches of 3 air loops. This row is designed to tighten the cover on the egg.
This is a very interesting way to crochet eggs. Knitting patterns are simple. The only difficulty is working with a thin thread. But you can easily find many more different patterns, experiment with different patterns and create your own unique holiday style, which will become your original idea.

Easter basket
The eggs are already ready, and to make them look even more beautiful, you will need a crocheted basket. To make it, you can use any thick thread.
- We connect 7 columns into a tightening ring. Next, we knit all the time behind the back wall.
- From each loop we make 2.
- Increase through 1 stitch.
- We knit rows 4-9 like this: we make an increase every 2 stitches, but you can do more if you want to make a larger basket.
- Decrease through 7 stitches.
- We knit rows 11-20 without any increases, just up - these are the walls of the future basket.
- 3 loops of the chain raise the row, then the basket is knitted with double crochets, adding loops. We do this by alternating 6 columns.
- We knit the fabric as is, in double crochet stitches, and complete the knitting.
We make a lapel from the wide part, knitted with double crochets. Now all that remains is to design the handle. We connect 8 loops into a ring, but do not tighten it too much, then simply knit upwards in simple stitches until sufficient length is obtained. Sew a handle to the base. You can insert a wire frame into the latter for stability. An excellent crocheted basket for Easter eggs is ready.

Chicken Ryaba
Let's look at some more crochet crafts for Easter and knit a corydalis.
- We make 16 double crochets into the loop.
- Rows 2-4 are made with simple columns.
- We knit 9 loops in a row with increases, the rest - simply.
- We knit 6-7 rows in a circle.
- We add 4 times through the loop, 11 increases in a row, 4 more increases through the loop.
- 3 chain loops, double crochet through 2 loops of the previous row.
- In 1 arch we make a column, in the next - 5 such elements with a double crochet.
- From 3 loops we make a column, and in the hole we should get 6 such elements with a double crochet.
- We design the 12th and 13th rows in the same way, only we knit 7 double crochet stitches.
- We knit the 14th row like the 11th.
- We knit the 15th in exactly the same way, only instead of simple stitches we use double crochets.
We make the tail, wings and comb with arches, and sew on black beady eyes. The chicken can be placed just like that or placed directly on the egg.

Easter bunny
The festive composition will be perfectly complemented by toys. The Easter bunny is not traditional for our country, but is gradually gaining popularity. Everyone will like the cute little eared one. It is very easy to knit.
First you need 2 round knitted blanks: one larger, the other smaller. This will be the head and torso. They are knitted using the technology of simple eggs, only with a uniform decrease. To calculate correctly, you can read the diagram backwards. Don't forget to leave a hole for stuffing. The ring is tightened last. You don’t have to hide the threads, but leave them long for later stitching together.
Small rabbit parts
To tie the paws, we start in the same way.
- Rows 1-3 - repeat the old pattern.
- We make 8 additions of loops in a row, and simply knit the rest.
- We knit rows 5-6 as is.
- We decrease through 3 loops. Then - through 2 loops. The paw is ready.
We also knit 3 more blanks and create another one of a slightly smaller size for the tail.
What's a rabbit without ears? The base is a chain of 12 air loops. Next, we make 5 half-stitches and 7 stitches, turn the work and knit everything in the reverse order.
The last step is to connect all the parts into a single whole. We attach eyes to the rabbit and embroider a nose. Cute Easter bunny is ready.

Crocheting for Easter will unite the whole family in preparation for the holiday and help create a bright and joyful atmosphere at home. Many different ideas and patterns will help you decorate your holiday table in an original way and pleasantly surprise your guests.
Lyudmila Klimenko
I invite you to look at my work" DIY crocheted Easter". I needed to get started work:Threads for Easter, threads for glaze, hook, rhinestones and beads.

.Easter I started knitting in the round starting from the central air loops, I knitted the sides to a height of about 10-12 centimeters.


Turn the can upside down. We put synthetic padding on the bottom and we pull it all over Easter related, securing the bottom by decreasing the loops.


For further work we will be needed: Sewing threads, rhinestones and beads. "we sew the icing onto the top part Easter. We sew rhinestones and beads onto the “glaze” to imitate powder.


The next stage of knitting is addition: plate. I also knit in a circle from the center, the circle should be slightly wider than the bottom Easter.


This is what happened. Not enough to complete the job easter eggs. For this we need threads of different colors (preferably bright color).


Foam rubber, scissors for cutting foam rubber into pieces, Crochet hook. Knitting Easter egg from the center of the circle starting with air loops. We knit the sides to the middle of the egg and then begin to reduce the number of loops. Shaping easter egg.

We don’t finish it until the end. stuff the “egg” with pieces of foam rubber to maintain the shape of the egg. After closing the egg, reduce the number of loops.

This is how it turned out Easter eggs.

And this is what I got in the kit.
Publications on the topic:
For a children's party dedicated to our mothers, in our second youngest group, according to the script, it was thought that our girls would be chickens.
Master class: In order to make such a balalaika, I took: plywood, gouache, brushes and clear varnish. And of course, a good mood.
To work you will need: 1. A pair of crazy pens; 2. Cones; 3. Green gouache paints, brushes; 4. Tinsel; 5. Vata; 6. Plasticine; 7. Colored cardboard;.
DIY photo frameA photo frame is the simplest thing you can do with your own hands - minimum cost, minimum time and maximum.
This master class is intended to be held at a thematic parent meeting dedicated to the problems of children mastering the material.
1. I bring to your attention a massager made from Kinder Surprise containers. To make such a massager you don’t need much.
Handicrafts before Easter!
In the Christian tradition, Easter occupies a special place as the “Feast of Feasts.” This is precisely the main meaning of the Orthodox faith - the deliverance of people from the power of death and sin. The Orthodox Church has been celebrating Easter for more than two thousand years. Its meaning was taught by the apostles, who passed on the tradition of celebration to their disciples. Thus, from generation to generation, the tradition of celebrating Easter has reached us and spread throughout the world.
The Easter holiday is moveable, that is, its date in each specific year is calculated according to the lunar-solar calendar. Easter is preceded by Great Lent, a time of abstinence, when all holidays, including family ones, are transferred to the celebration of Easter, and the scope of Easter festivities is associated with breaking the fast after Lent. The symbols of Easter are everything that expresses Renewal (Easter streams), Light (Easter fire), Life (Easter cakes, eggs and hares)
Celebrating Easter is, of course, not only about attending divine services. This holiday has always been loved by the people and many customs are associated with it: decorating the table in a special way, preparing special treats, giving each other special gifts!

![]()
Life in worries and works continues every day, but we must not forget about our health and relaxation, good impressions and new positive emotions. One of the best holidays is a trip to a holiday home or sanatorium, as well as comprehensive treatment and recovery of the whole body. Holidays in Crimea, all the best tourist places, beaches, museums, amazing sights, as well as types of resort areas, climatic features and much more are here
Easter is the most anticipated spring holiday. People prepare thoroughly for this day - prepare treats, paint eggs, clean and decorate the house. beautiful products will bring a lot of pleasure. To decorate the holiday table for Easter, as well as for gifts, I suggest knitting colorful chickens.
For knitting chickens You can use various leftover yarn, combining colors as you wish. The main part of the chicken should be knitted tightly, using yarn of medium thickness or by folding a thin thread into several folds, then the knitted chicken will keep its shape.
Description of knitting chickens for Easter:
Start knitting from the head. From the ring, make 3 chain stitches and 12 double crochets, close the row into a circle with a connecting loop.

Next, knit circular rows with single crochets. In the first row, make increases by knitting 2 tbsp from one loop, through 3 loops, in the next two through 4 loops. The knitting takes the shape of a cap - this is the top of the head.

Knit the next two rows without increases, and then three rows with decreases, knitting 2 tbsp together through 4 loops.

We form hangers by knitting a row of double crochets. Make 2 chain lifting loops and knit st s/n, making increases - from one loop, knitting 2 st s/n through one loop. Finish the row with a connecting loop and start knitting the skirt.

The chicken skirt is knitted with a fan pattern. In the first row of the skirt, knit fans like this: *skip one loop from the next one, knit 5 sts, secure the resulting fan with a connecting post, skipping one loop from the previous row*, repeat *-* until the end of the row.


To transfer knitting to the second row of fans, knit along the first fan with connecting loops to the top, and knit the first fan of the second row from 5 sts, sticking a hook between the fans of the previous row, fasten the fans at the tops of the previous row.


Having finished the second row, proceed to the beginning of the third row as well. In the third row of the fan, knit from 5 tbsp. s/2n. In the fourth fan, knit from 6 sts s/2n, in the fifth from 7 sts s/2n. Finish knitting the skirt with the last row of connecting stitches so that the edge holds its shape better.

To knit a scallop, attach a red thread and knit 3 arches from 4 chains. loops along the top of the head. Having secured the last arch with a connecting post, turn the work and knit back from each arch a double stitch, a half stitch, 3 double stitches, a half stitch, a double stitch.

To knit a beak, join the yarn in place, make 3 chain stitches and 2 double crochets at the same point from the same point. Fasten and cut the thread.

The wings are knitted on the sides. First, knit arches from 5 air. loops, secure them with connecting posts. Back from each arch, knit st b/n, half st., st s/n, 2 st s/2n, st s/n, half st., st s/n. Attach a thread of a different color to the edge of the wing and knit along each mound: sc, half treble, 6 treble, half treble, treble.
On the bright holiday of Easter, it can be especially nice to give loved ones a souvenir that keeps your hands warm, or to decorate your home and holiday table with cute crafts. The main thing is that even those who have recently picked up a crochet hook or knitting needles will not have any difficulties in making the knitted Easter crafts that we have prepared for you, and children may well try to make some of the patterns.
Eggs
Even in ancient times, the egg was considered a symbol of life and resurrection. However, it is believed that eggs appeared on the Easter table thanks to a legend. During the Roman Empire, people could only visit the emperor with a petition by bringing him a gift. When Mary Magdalene decided to bring the news of the resurrection of Christ to Emperor Tiberius, it turned out that she had nothing but a white chicken egg. Then, handing the emperor her modest gift, she said: “Christ is risen!” In response, the emperor laughed and replied that he would believe such news only if this white egg changed its color to red. At that very moment a miracle happened and the egg turned bright red. Then the utterly surprised emperor said: “Truly he has risen!”Whether this was so is unknown, but the tradition of painting eggs, exchanging them and putting them on the festive table has been around for centuries. Gradually, along with dyeing eggs, the custom of decorating them in other ways appeared, and then at Easter they began to give each other fake eggs more often as a gift. We invite you to support the tradition. And, for example, knit (or knit) an egg with crochet or knitting needles.


However, you shouldn’t limit yourself to knitting. You can try, for example, making an embroidered egg, making an egg from fabric or felt, decorating it with braid, buttons, rhinestones and anything else.

Egg warmers
A great opportunity to decorate the holiday table in an original way (and not only for Easter) is to use egg warmers. Their big advantage is that you can use such warmers for more than one year, and by knitting several different sets, you can diversify your table decor.There are a great variety of hot water bottles, from funny hats (just like real ones, even with pom-poms) to nesting dolls and hares, which look more like toys than hot water bottles. We invite you to knit simple patterns that will delight both children and adults.

- Egg warmer “Hat with pompom”

- DIY egg warmers made from non-woven fabric and felt
Easter bunnies
Despite the fact that, according to all the logic of things, the chicken should take first place among the animal world at the Easter celebration, this poultry takes second place. And in the first place is traditionally the rabbit (in the Russian version it is also often replaced by a hare). Some say that the reason for this is the known fertility of rabbits, so this animal symbolizes birth and life. Others believe that it just “happened that way,” but the fact remains. We invite you to keep up with traditions and decorate your home with a rabbit figurine.You might also be interested in:

It is very important to instill respect and culture in our children. I think it's very correct...

If you want to attract your child to some kind of creativity, then start creating with him...
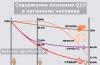
Coenzyme Q10 (ubiquinone) is a enzyme discovered in 1957 by scientist Fred Crane. How...

The first month of a baby’s life is magical and hectic at the same time. Required in the first month...
The magic of beauty has always been held in high regard by the fair half of humanity. And everyone...

