


Bring children the most joy? Of course - toys and sweets! Let's try to combine them in one gift and sew a bunny bag for candy. By the way, it can also be used to wrap Easter treats.
To make the bag we will need: linen for the outer bag, bright floral cotton for the lining, toy eyes, decorative buttons for decoration, and a ribbon or lace for tying.

We print the pattern on an A4 sheet at a scale of 1:1. From linen and cotton we cut out 2 parts of the bag and two parts of the ears.


We glue the eyes to one of the linen parts and embroider the bunny's face, and to the second we sew a wooden button with the inscription “Hand-made”.

We take the details of the ears. We place a cotton piece on the linen piece so that the pattern is inside. We lay a zig-zag seam around the perimeter of the ear.

We turn the ears inside out, iron them and, stepping back 2 millimeters from the fold line, lay a straight line around the perimeter.

We take a linen piece with a button and tailor’s pins and pin the ears to it with the pattern facing up.

Cover the top of the product with a cotton pocket piece, wrong side down. We lay a straight line along the base of the bag.

We perform similar actions with the second part of the bag. The end result should be something like this.

We retreat 5 cm in each direction from the fold line, fold the fabric inward and secure it with a straight stitch.

We decorate the edges of each part in this way. Place both pieces with right sides facing inward. We make sure that the cotton parts match with the cotton ones, and the linen parts with the linen ones. We fix the workpieces with pins.

We lay a straight seam along two long and one short sides. We leave only the base of the cotton parts open. We turn the bag inside out through the unclosed hole, which we then close with a hidden seam. We insert the lining into the bag and, stepping back 1-1.5 cm from the edge, lay a straight line around the perimeter, thereby securing the drawstring.
I welcome everyone to the pages of the diary) Today I want to invite you to gradually begin to be inspired by ideas for the holiday of Easter. Maybe someone would like to sew such wonderful bags in the shape of rabbits for Easter eggs, sweets and other gifts for children? The photo master class below will help you get the job done easily and quickly. Good luck!
And I’m also adding ideas for Easter so that you don’t get bored with me) Below you will find a pattern for a textile bird, a pattern for sewing a basket for Easter eggs and a pattern for an Easter napkin with applique and embroidery


A small useful digression for all businessmen. Don’t want to buy a ready-made company for your business? The RegAdvisor company offers ready-made LLC companies in Moscow, with a current account. You can buy yourself a company, for example, a construction company, with a license in one click and start earning money tomorrow) Read all the details on the company’s website regadvisor.ru.
So, how to sew a RABBIT bag from fabric for the Easter holidays. For work we will need:
- plain linen fabric for the front side of the bag,
- cotton printed fabric for lining the bag,
- threads for sewing parts and for embroidering the face,
- needles,
- sewing machine,
- scissors,
- braid or rope.
Let's get to work. We print on a printer or transfer directly from the monitor screen the template of the bag and rabbit ears. Before printing, you need to enlarge the pattern to the size of the bag you need.


We sew together the details of the ears and combine the linen fabric with the printed fabric. Do not forget to make notches along the round edge with scissors; when turning the parts inside out, we will get neat, well-turned ears. 
We turn the ears inside out and stitch them from the front side along the edge, like this:

Sew the details of the bag

Sew on the ears:

We will sew our bag from these two processed parts:

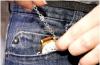
On one of the parts of the bag, which is without ears, we put a stitch at a distance of 1 cm from the edge and thread a ribbon or string.

Textile bird

Bird pattern: 
Easter egg basket

Pattern for sewing a basket:

Easter napkin with applique and embroidery


We sew original bunnies for Easter. Schemes are attached.
Easter bunny.
Ideas and master classes.
What kind of bunnies and bunnies do craftswomen come up with! On this page, let's look at simplified ideas for Easter bunnies and bunnies with patterns for sewing them.
An original idea is a bunny in the form of a bag in which you can put painted Easter eggs :)
The external seams do not at all detract from the dignity of this bunny :)
This wonderful bunny can be used to decorate an Easter wreath or for any other Easter decoration.
To sew this bunny, thick burlap and, of course, a template for cutting are used. We cut out all the details according to the template and sew this little one on a machine or even by hand :) To give it some pampering, we tint it with paint or even add our own blush for it :) The face itself can either be drawn with a liner or contour gel, or embroidered with black threads.
Heather collected in the forest is perfect for decorating a wreath, which can additionally be decorated with homemade wildflowers made of fabric or paper. looks very natural and in eco style:) near the bunny itself we place homemade eggs made from polymer clay, cold porcelain or salt dough.
Use this template to make your Easter Bunny.
Based on materials from the site-creativetryals.blogspot.co.uk
The bunny bag also looks good with front seams. To prevent the fabric from splitting and to look beautiful, use zig-zag scissors to cut out parts.
These bags can be filled with padding polyester or dried lavender, or you can put a couple of little surprises inside :)
In this original style you can quickly sew bunnies of different colors :)
To give out gifts - line up! :))
Similarly, transfer the template to the fabric and carefully cut it in a zig-zag pattern with scissors.
Fold the fabric in half, wrong side out, so that the bottom of the piece falls on the fold folded in half and transfer the template.
The pattern will be better visible from the back side than from the front side.
Trimming with zig-zag scissors:)))
turn it inside out, connecting the parts on the front side.
It's time to start sewing both halves together.
Don't forget to leave a little bit of open space at the bottom of the piece so that you can fill it with padding polyester.
Help with a pencil to push padding polyester or dry lavender into the narrow places of the part, while singing a song about hares: “But we don’t care... we’re mowing the grass!” :)
Having filled the entire part to capacity, to the tune of the song about hares, do not forget to stitch the hole with thread.
Additionally, you can decorate these bunnies at your discretion. For example, tie beautiful bows around their necks :)
Agree, such bunnies are not at all difficult to sew, and this idea can be used for gifts and Easter interior decor :)
based on materials from the site-thelittlefabricshop.blogspot.com
bunny patterns.
And of course, we’ll focus on choosing an Easter bunny template from the selection. which will delight you with its varied assortment.
You will get great pleasure from sewing it :) Don't forget to attach a tail at the back :)
First, we decorate this handbag in a spread with eyes, a nose, and additionally sew additional details onto the ears.
Greetings. Today I want to give you some interesting ideas on how you can make your own Easter bunny. It can be used as a symbol of Western Easter, as interior decor, or simply as a cute gift for loved ones.
Before moving on to the actual description of the creation process, I would like to explain why I chose the theme of fluffies and what they have to do with Easter. And their connection with this holiday is the most direct - bunnies are symbols of fertility and new life in the West; Germany is considered their homeland. In our country, these meanings are transferred to eggs and Easter cakes.
There are a lot of legends about why the rabbit was chosen as a symbol, but for you and me, I think it’s time to call the kids and start choosing a craft.
As a cute present, I suggest making a wonderful bunny from a terry towel. And inside we will put a Kinder Surprise or a real boiled egg. Can you imagine how happy your baby will be? I am sure that he will definitely remember this holiday.
So this craft can also be used as an egg stand.
I have prepared two step-by-step master classes. Both of them are easy and quick to do, so I’m just confident that you will succeed.

We will need:
- towel (30*30 cm)
- 2 hair ties
- beads for eyes and nose
- Kinder
- Double sided tape
Since this craft is completely waste-free, we will not use scissors and a knife for it, but we will cut three small pieces of tape in advance and glue the nose and eyes to them.

You can take the towel in other sizes, but then be prepared to get longer ears.

Notice that all the ends matched and the edges were smooth. Still, the child will appreciate neatness.

Instead of an elastic band, you can use a satin ribbon, but it is not very convenient to tie, so I ask you to be prepared and find or purchase two elastic bands in advance.

Lower the elastic band of the body to better press the kinder, otherwise it may slip out of the towel.

You can also glue carrots or flowers.

Do you think your child will appreciate your idea? I think that such an extraordinary congratulation develops children’s imagination well.
Also look at how you can roll a towel in a different way; everything is shown in order in the picture.
You will need:
- square towel,
- scrunchy.
The first step is to find the middle of the towel. Next, we twist its ends into a tube; here it is important to straighten the corners and edges.

Now fold the workpiece in half and put the elastic band on the towel. You pull the edges as if you want to pull them out, but do not do this, leaving the free ends pressed against the body. This is how we formed the head and ears. All that remains is to move the ears themselves away from each other.
You can, as in the previous version, put the testicles inside, and glue the eyes and nose on the craft itself.
DIY Easter bunny on a postcard
I wrote a little about postcards in the article, but there are a lot of ideas, so let’s make a bright congratulations with a bunny.
The card itself is very joyful, and what inspired me most was the bunny’s tail. It doesn’t have to be made flat out of paper; you can glue a fluffy pompom instead.
You will need:
- scissors,
- glue,
- white sheet of paper,
- thick cardboard for the base,
- about 20 multi-colored stripes, 1 centimeter wide and length corresponding to the width of the base.
My daughter and I cut out these strips from self-adhesive colored paper. It is sold in regular stationery stores and has bright, saturated shades of sheets.
The strips may not be the same length if you don’t have enough of them, but the middle must be even. Because the edges will be covered by the top sheet of paper, but the middle will remain visible.

You can draw a bunny schematically or not like this, but this one has a very cute tail. Cut it along the outline and glue it on top of the side of the base with stripes.

If you are doing a craft with a child, then use PVA glue; it is considered the most harmless and non-toxic.

Still, you need to try making a donut instead of a ponytail! Sign the message and the postcard is ready.
Fabric bunny with patterns
Cute fabric rabbits are very good as decoration. They are easy to sew and look very cute. And if you choose floral fabric, the animal will also become a symbol of spring!
Of course, needlewomen will be happy to start creating, and I offer them diagrams for inspiration.

You will need:
- soft gray fabric
- white fabric for ears,
- scissors,
- threads with a needle,
- any filler (cotton wool, padding polyester).
The details from the diagram above must be transferred to fabric and cut out. Each part needs to be cut out two pieces.
We apply all the matching parts with the wrong sides facing each other and sewing the edges, leaving a little edge free.
For example, we fold the foot in half and sweep the edges, leaving the tip free. We turn the part inside out and fill it with padding polyester, and sew up the edge.

We make the ears from two types of fabric and put two machine stitches in the middle, as in the picture.
Assemble all the parts and use thread knots to make eyes and a nose. You can use beads instead if you have them.
Another interesting option for animals. Everything here is generally simple, transfer the parts onto the fabric, fold them right side inward and stitch them, also leaving the edge free.
Turn the part inside out and do the stuffing. Then you stitch this edge by hand.
You can decorate with beads and ribbons. If you take a beautiful elegant fabric, then little decor is needed, just to indicate the eyes and neck.

You can use this pattern. Just a reminder that you need to cut out two pieces.

For those who don’t want to make the whole flock according to one pattern, I’ll give you another, very cute one. By the way, it is also perfect for making felt products.

Well, a very simple, but very cute version of bunnies.

It’s not at all a shame to put such textile animals in a basket and give them a treat.
Master class on how to crochet a rabbit with diagram and description
Let's crochet this animal! This is also quite simple. I will provide a drawing that describes the sequence of knitting rows step by step. By repeating the description, it will be easy for you to repeat the entire process from beginning to end on your own.
In the bottom diagram, “sc” means single crochet.

A simple one-sided applique can be made according to the bottom diagram. This shows the sequential arrangement of chain stitches and double crochets in rows.

To make it even clearer for you, I suggest watching a video where a needlewoman shows in detail how to knit a bunny.
The video shows how to assemble single crochets into a ring and how to increase the width correctly. Try this, because crocheting is not difficult, and when you master the simple patterns given above, then you will be able to create very realistic rabbits.

They deserve praise, right?
Felt symbol
Felt is loved by many craftswomen, because it has such a variety of colors, and it’s also a pleasure to work with. You can choose different thicknesses of the sections, but you should not buy fabric for this craft that is more than a millimeter thick; it will be difficult to create with it, because it will not obey your hands and follow the desired curves.

You can use all the patterns given in this article for bunnies, because felt is a very pliable material.

Well, if you don’t want to use seams, then all the parts can simply be glued together.
Just choose a colorless glue, otherwise it may seep through the fabric and leave unsightly marks.
Cute bunny made of threads
For the little ones, I suggest making an animal from woolen threads. It is made using a pompom and cardboard.
We will need:
- wool threads,
- cardboard,
- scissors,
- felt,
- beads for eyes and nose,
- needle and thread.

To make these bunnies you need 1 large pompom for the body, 1 medium one for the head, 2 small ones for the front legs and 1 small one for the tail.
All pom-poms are made according to the pattern from below. The basis is two cardboard rings of the required diameter, which are wrapped with thread.

Then we cut the thread between the rings with scissors and pass the pre-cut thread between the rings to tighten the pieces. This is shown in detail in the photo.

We will cut out ears from felt and sew them to the head with threads.

All that remains is to fasten the pompoms and glue the eyes and nose with hot glue. You can also make the following craft using a thread base.

Only here the pompoms are not taken out of cardboard rings, which act as the base and body of the craft. The head is a continuation of the pom-poms, so draw the diagram with the head, ears and body on one part.
Easter bunny made of paper
Cute little bunnies can be made from any material, but the most accessible and favorite for most children is paper. You draw what you want on it, and bend it as needed. Look what a cute egg holder you can make.

For this craft, use this template, you can immediately print and cut it out. Where dotted lines are shown, the paper needs to be folded and glued.
The template consists of two parts that are connected to each other. I think your kids will definitely be delighted with such a funny and cheerful craft.

And another interesting option for you to note: my daughter and I have already tried it - the child was delighted. Of course, I had to cut out all the parts myself, because she still doesn’t know how to cut straight. And everyone likes crafts that are smooth and neat.

We will need:
- album sheet,
- colored cardboard,
- glue,
- scissors,
- markers.
Take this diagram as a basis, simply print it out or attach a sheet of paper to the monitor screen and carefully trace it with a soft pencil.

Fold lines are shown as dotted lines, and straight lines need to be cut. These will be the legs. You can glue them to any sheet of cardboard; we made a clearing in the photo.
The eyes and mouth can be made with a felt-tip pen, or you can use beads.
Important! Tape the fold of the head well because it can peel off easily.
Well, also note for you the idea of crafts from egg trays. The cell is cut off and its bottom is trimmed. And the decor is glued on, so you can, of course, make not only a rabbit, but also a chicken, a bear or a cat.

Any joint creativity develops children's fine motor skills, which contributes to the normal development of speech. And also the development of imagination, especially when the child chooses the color and decor for a future craft.
Making a bunny using origami technique
Origami is a fairly well-known technique in which a figure is made from paper without the use of glue or scissors. With the correct bending of the lines, the figure folds very easily. There are more complex patterns that children cannot complete, but there are very simple ones, for example, when we folded.
For Easter, this technique will help us make cute egg cups. And all you need for this is attentiveness, a sheet of paper and a felt-tip pen.

Below are step-by-step instructions for folding with a description.
Important! Do not take a thick sheet, it is very difficult to roll the shape.

And another interesting idea for an animal using the same technique. Make it a little lighter, and it can also serve as a basket.

To ensure that all the crafts turn out neat, calm down and pay full attention to what you are doing. After all, they say that whoever is given a rabbit for Easter will be happy all year. And, if this gift was made with your own hands, then it was also made by your loved one. Nice, isn't it?
Tweet
Cool
Every year the big and bright Easter holiday comes to us. Have you ever thought about celebrating Easter in some original way, not limited to eggs painted in onion peels? To feel the Easter mood as much as possible, you need, first of all, to decorate your house for the holiday. Of course, decorations for Easter will delight you and give warmth and comfort to your home. You can make many of them yourself. Ideas for Easter decorations and compositions are varied and numerous, a little imagination - and your home will become beautiful and stylish.
Easter symbols
Easter eggs
1. Vintage Easter egg
The magnificent craftswoman Daria Vistavna showed a master class on creating an Easter egg in a vintage style. To create it you will need: a wooden egg blank, acrylic paint, guipure, threads, a needle, beads, beads, various decorative elements. First you need to paint the wooden egg blank. After the paint has completely dried, wrap the egg in guipure and wrap it near the stem with thread. Then sew beads and beads to the guipure. At the end, glue decorative elements (flowers, sisal nest, bird).


2. Easter eggs made of chenille wire
Original decor of Easter eggs does not have to be long and labor-intensive. An excellent solution is to decorate plastic containers in the shape of eggs with chenille (shaggy) wire. This wire should be wrapped around the eggs, securing with a hot glue gun. By combining chenille wire of different colors, you will get bright and rainbow decorative eggs for Easter.


3. Easter egg with embroidery
Embroidered Easter eggs serve as a wonderful home decoration for the holiday. To create them you will need: an empty eggshell, a napkin,
canvas, thread, needle, glue.
First you need to take an egg, make holes in it with a needle on both sides and blow out the contents. Wash the inside of the shell and dry it. Take a thin napkin, cut a rectangle out of it the size of the egg, apply it to the shell, wet it with water so that the napkin sticks completely. Leave until completely dry. Then, using a pen, draw a line around the circumference of the egg, conditionally dividing it into two halves. By removing the napkin and cutting it along the line, you will get an exact pattern for embroidery. Then select a design for embroidery (in this case, a chicken), and cross-stitch it on the canvas. Attach the pattern to the embroidery, and cut the canvas according to the shape of the pattern (the chicken should be in the center). Soak the canvas in hot water for a while to soften it, and then spread it evenly over the egg. Wrap the egg and canvas tightly in a napkin and leave until completely dry. Once the napkin has dried, carefully open it and apply glue to the edges of the canvas. Next, moisten the surface of the egg, wrap it tightly in a napkin again and tie it with braid. After the outline is glued to one side of the egg, do the same with the back side.


Cover the joints of the canvas with decorative tape, gluing it to the egg. Place the egg on the stem and decorate with a bow. Stick the egg into the flower pot.


4. Shabby chic Easter eggs
Craftswoman Silwia Serwin creates stunning Easter eggs using drilling and 3D decoupage techniques. You need to apply the desired design to the egg blank. Then use a drill to carefully drill the holes. Apply a special volumetric contour to the drawing. After complete drying, sand the contour and paint with acrylic paint using a sponge. When the paint is dry, go over the outline again with sandpaper.


Cut out your favorite design from a napkin. Glue it, open the egg with varnish on top.


More works by this craftswoman using a similar technique.


5. Easter eggs made of rope and fabric
Unusual elegant Easter eggs can be made using foam blanks, cord and fabric. You will need: a foam egg blank, a rope (lace, twine), fabric, threads, a needle, a hot glue gun, wooden or plastic rings (from curtain rods), artificial roses, a hook, a ribbon, floss threads.


Tie the rings with thread - they will serve as egg stands. Cover the surface of the eggs with a tourniquet.

Cut the fabric into squares, which are then folded into triangles.

Attach the triangles with pins to the foam blank.

Decorate the eggs with ribbon bows and artificial roses.


Easter bunny
The Easter bunny (hare) is also a symbol of Easter. Since the 15th century, there has been a belief that the Easter bunny comes to obedient children and gives them a nest with sweet eggs as a gift. You will sew an Easter bunny, make it from paper, papier-mâché, polymer clay, wax, sugar and marzipan, in the form of applique, origami, bake cookies in the shape of a bunny. The options are endless and limited only by your own imagination.
1. Easter bunnies made from socks
Easter bunnies made from socks are easy to make, so you can involve your child in the process. You will need: socks, scissors, felt, filling (cotton wool or rice), pompom, ribbon, elastic bands, toy eyes. Fill the sock with stuffing, tie elastic bands on both sides to create a rabbit's body and head. Cut an oval out of felt and glue or sew it to the bunny's tummy. Glue on the eyes, nose, teeth. Glue the pompom tail to the back. Tie a ribbon around your necks. Cut ears from the top of the sock.


2. Easter bunnies bags
Delight your children with original Easter bunny bags in which you can put sweet gifts or colored eggs.
This bunny is sewn from felt in the shape of a bag. Sew eyes, a nose, and additional ear parts onto the bag. Sew a pompom tail at the back. Fill the bag with gifts and tie with a ribbon.


These cute sleeping bunnies are sewn using the same principle.


3. Burlap Easter bunny
To sew this rabbit you need thick burlap. From the template (see below) you need to cut out all the parts. Sew them and tint them with paint. The rabbit's face itself needs to be embroidered or painted with three-dimensional paints.


You can easily fit such a rabbit into a composition of a heather wreath decorated with wildflowers.

4. Rabbit made of fabric napkin
Well, the easiest option is to decorate the Easter table with bunnies folded in the form of napkins. These napkin rabbits look funny and fun.


You can fold them according to this scheme:


Easter tree
There is a long-standing tradition of decorating trees for Easter with decorative painted eggs. Use this idea to decorate your home. You can take a few twigs and stick them into a pot filled with wet sand. You can turn any tall indoor plant into an Easter tree. Decorate the branches themselves with eggs, ribbons, toys in the form of Easter bunnies and birds.


You can also make an Easter tree in the form of a topiary. To work, you will need a blank in the form of a foam egg, pins, any container (vase, cup, pot), floral filler and many different buttons.


Easter wreath
An Easter wreath can serve as a beautiful decoration for your front door for Easter. It is made from dry twigs, grass, burlap, and decorated with flowers, ribbons, feathers, eggs, toys in the form of hares and birds.


1. Easter wreath made of yarn
The basis of this wreath is a circle of polypropylene foam and grass yarn. You will also need finishing tape in the shape of flowers and pins. The yarn should be carefully wound around the base circle. Cut the ribbon into individual flowers and attach them to the wreath with small pins. This wreath can be further decorated as your imagination tells you.


2. Burlap wreath
To create a burlap wreath you will need: wire, burlap, artificial flowers, moss and decor in the form of a nest with eggs. Make 4 rings of different diameters from wire and connect them so that the two middle ones are higher than the first and last rings to make the wreath more voluminous. At equal distances between the rings, you need to secure the transverse sections of wire. Cut the burlap into strips and roll them into rolls. Then you should pull the burlap loops through the wire to create beautiful voluminous folds. Fasten the burlap to the wire frame from the wrong side. Vary the size of your stitches, their order and direction. This will make the wreath more magnificent. Secure the end of the burlap to the back of the wreath. Decorate the wreath with artificial flowers, ribbon, moss, and a nest with eggs.


Easter compositions with flowers
One of the main symbols of Easter is renewal. In spring, nature is renewed - fresh grass appears, everything blooms, turns green, and enjoys the warmth and sun. Therefore, no Easter decor can be imagined without flowers. First of all, these are early flowers - tulips, daffodils. Flowers in the composition are often combined with Easter eggs, branches, twigs and other elements of Easter decor.


You might also be interested in:

A week after celebrating the most wonderful and joyful event of all...
A watch is a traditional and functional accessory. One of the most interesting and stylish...

It is very important to instill respect and culture in our children. I think it's very correct...

If you want to attract your child to some kind of creativity, then start creating with him...
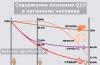
Coenzyme Q10 (ubiquinone) is a enzyme discovered in 1957 by scientist Fred Crane. How...

