


The Great Patriotic War will never lose its enormous historical significance for all countries of the former Soviet Union. This is confirmed by the annual events of educational institutions, which help us convey to children the events of the war years. One of the most effective ways to explain the essence of Victory Day to the younger generation is to make crafts for May 9th.
Preparatory work for the celebration of Victory Day is being carried out in all schools and kindergartens. Teachers and educators offer children make crafts for May 9, which are sent to thematic exhibitions or given as gifts to veterans and children of war.
If you are already thinking about what to make with your child crafts for May 9 on Victory Day, We invite you to check out some creative ideas.
Holiday craft for a preschooler
Every manual work done by a child under 6 years of age should be not only entertaining, but also developmental. When making crafts, a child needs to learn to think abstractly and unconventionally, develop imagination and learn to be neat.
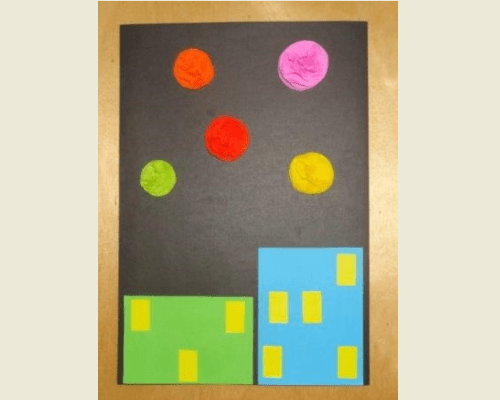
We invite you to try this with your baby. craft postcard for May 9"Victory Salute":
To make such a simple card you will need some materials and tools:
- Decorative paper of different densities (corrugated, colored)
- Simple pencil and ruler
- Glue (we recommend using dry, quick-drying glue so that the child does not get dirty)
- Stapler
- Stationery scissors and some kind of round object that the child can trace to make card elements
What sequence of actions must be followed to make a postcard:
- Take colored corrugated paper and fold it like an accordion.

- Circle round objects on the front side of the accordion to make circles (5-6 pieces of the same color) - they will represent fireworks in the picture.
- Cut out the circles using stationery scissors.
- Do the same procedure with paper of other colors (to create fireworks, use bright paper - yellow, red, blue).
- Use a stapler to staple the identical circles. The top layers will need to be lifted and pressed down so that they begin to look like flowers.

- Cut out 2 rectangles from plain colored paper. One of them should be slightly higher than the other.
- Cut out several small squares from yellow or orange construction paper.
- Glue rectangles onto black cardboard (A4 size) that will represent apartments, and on them squares – windows.

- Glue the prepared fireworks shots to the top of the craft.
Holiday craft for a schoolchild
A junior school student can already make a more complex voluminous crafts for May 9. For example, here is the “Victory Monument”:

To create it, you do not need to purchase any special material. You definitely have everything you need at home and in your child’s briefcase:
- Colored cardboard and paper
- Simple pencil, ruler and glue
- Rectangular box of chocolates and ballpoint pen paste
- Cover the candy box with colored paper (the color does not matter). We recommend sealing the bottom of the box with paper either black, gray or brown.
- Cut out small squares from white paper - 2 by 2 cm. They will represent a tile.

- Make small flower beds out of colored paper using trimming - wrap strips of colored paper around a ballpoint pen. Glue the resulting scrolls one by one to each other, forming flower beds.

- Glue a monument out of cardboard - form parallelograms of different sizes and cut out a shape that will imitate a pedestal in appearance (you can glue a star made of red colored paper to the pedestal).

Paper crafts for May 9
Making a paper craft is the easiest way to congratulate a veteran on the Great Victory Day. There are many interesting techniques that you and your child can use to make a beautiful greeting card. For example:
Crafts for May 9th using quilling technique
We propose to make such a beautiful white dove against the background of the blue sky, because this symbol of peace is very relevant for Victory Day:

To make this card, you will need:
- Blue cardboard
- White quilling paper
- Red double-sided colored paper
- Scissors or utility knife
- Toothpick and tweezers
- Simple pencil
The process of creating a dove is simple:
- First, draw the outline of a dove on a cardboard base.
- Twist quilling patterns on a toothpick (in the shape of an eye from white paper, and in the shape of droplets from red paper)
- Glue white blanks along the contour to make a dove (make the beak from red paper)
- Glue the red blanks to the place where the flower should be located
Crafts for May 9th using origami technique

- Cut red double-sided construction paper into 5 equal squares;
- Make 4 folds on each square (they should bend towards the center);
- Each triangular one needs to be bent diagonally;
- All blanks now need to be connected to each other using corners.
Beautiful crafts for May 9 made from fabric
As a rule, handicraft masters use fabric to make toys and sew clothes. However, this material can also be used to create such crafts for May 9, like a tank:

In order to make such a craft, you do not need to have any special skill. You just need to take a few simple steps:
- Prepare a model of the future tank from cotton wool and wire or polystyrene foam;
- Take measurements of the workpiece to prepare a pattern made of felt or any other dense fabric;
- Cover the layout with the resulting pattern;
- Use buttons as tank wheels (if you have ideas for other decorative elements for the tank, you can add them to the craft).
Crafts on the theme of May 9th from beads
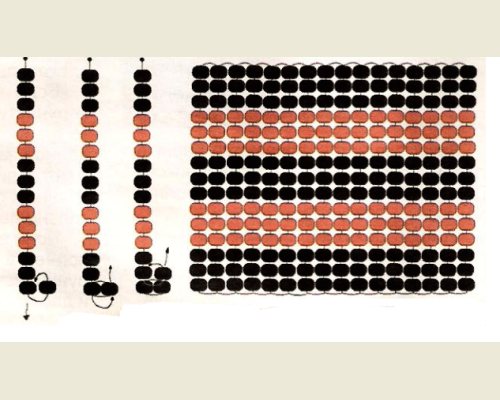
Working with beads is very simple if you have a diagram of the product you are going to create in front of your eyes. As original crafts for May 9 You can weave a beautiful St. George ribbon from beads:

To make it, you need to purchase orange and black beads, fishing line, a needle, and also be patient, since beading is painstaking work. You can find a diagram for making a St. George ribbon on the Internet. We suggest you use this simple scheme:
Options for crafts for May 9: photos
In addition to all the crafts presented above, you can try to make other, more complex ones. We presented them in this article as samples and examples of creative ideas that may inspire you to be creative.


Perhaps, modeling jewelry intended for the celebration of Victory Day is a very responsible mission for kanzashi craftswomen. If you want to learn how to make a kanzashi brooch for May 9 with your own hands, study our master class with step-by-step photographs. In this case, it is wrong to use bright colors and flashy accessories, because the main symbol of the holiday is the St. George's ribbon.
Since the time of Catherine the Second, outstanding warriors have been awarded orders that contain a black and orange element. To this day, the St. George ribbon remains a symbol of an irresistible desire for victory, an indicator of dedication and heroism in the battle for the Motherland. Nowadays, this element of decoration has acquired a special meaning - the younger generation thanks the Veterans for the happy and peaceful life given to them at the cost of difficult trials. And in honor of the heroes, on the eve of May 9, everyone puts on a wonderful accessory. Let us consider in detail what is needed for creative work, how to create a beautiful, festive and unusual brooch using the kanzashi technique for the holiday of May 9 with your own hands.
To model a brooch by May 9 you will need:
- 14 pieces of black ribbon - 5*5 cm squares;
- 7 pieces of orange ribbon - 5*5 cm squares;
- 7 pieces of orange ribbon - squares 2.5 * 2.5 cm;
- 7 pieces of black tape - 4*4 cm squares (such tape is not always on sale, if this width is not available, you can take pieces of 5*5 cm and cut them);
- 7 pieces of orange ribbon - 4*4 cm squares;
- discreet hugger - diameter approximately 2 cm;
- the middle is in the form of a black half-bead - diameter 1.4 cm;
- base made of black felt - circle diameter 4 cm.
Components of the decoration:
- a star made of red felt with a gold frame as a base or a loop made of a wide (5 cm) St. George ribbon;
- three-dimensional flower consisting of four-layer black-orange and double black-orange kanzashi petals;
- pin.
How to make a kanzashi brooch for May 9 with your own hands
1) Four-layer petals will be made of black squares with a side of 5 cm and orange - two sizes: 5 cm and 2.5 cm. For one petal you need to prepare 2 black and one orange large square, 1 orange small square. It is this combination that is relevant and reminiscent of the St. George ornament.

2) To make the blanks, bend all the parts diagonally. At each stage, you can solder the workpieces with a lighter flame and help yourself with tweezers so that the satin does not slip.
3) Bend the re-obtained triangles along the heights. These will be the layers for the petals.

4) First you need to make a large triple petal in the following sequence: black - orange - black layers, separately model a small single petal - the middle of an orange square with a side of 2.5 cm. Fold the parts together and roll it up like a boat.

5) Glue a small petal into a triple one. This trick is simply necessary for beginning craftswomen, because working with several layers of tape at once is quite difficult.


6) A total of 7 parts are needed to model the flower.

7) Gather the petals onto a thread.

8) Make small size double petals using the same method. To complete them, you will need blanks with a side of 4 cm. Prepare a hug and a black half-bead.

9) Make an elegant center of the St. George flower. Glue in the fittings.

10) Glue medium-sized double petals between the main parts of the already prepared flower.

11) Glue to a black felt base.

12) The resulting decoration can be applied to a red felt star. The edge of the star will look solemn if it is ennobled with a gold splint or even a cord.
Surely everyone knows the kanzashi technique. Using this technique you can create a huge number of products that will have a very beautiful appearance. It is worth noting that crafts made from kanzashi for May 9 look especially attractive. In our article you can find ideas that will appeal to schoolchildren.
Crafts using the kanzashi technique
Beautiful brooches that are not difficult to make.
Even schoolchildren can make a beautiful brooch that can be pinned on the Victory Parade. In this case, the following materials will be required:
- Sections of St. George's ribbon. One should be longer and the other shorter.
- Black satin ribbon.
- Thread with a needle.
- Scissors and glue.
- Lighter and pin.
- Decor elements.
Progress:
- A piece of St. George's ribbon measuring 30 cm is folded in the shape of the number 8.
- With another smaller piece, wrap the figure eight in the center. Secure it with glue along the walls or from the inside.
- Use black ribbon to lay out the base of the jar. In this case, join the ends at the bottom center. Connect them with a cross.
- Now assemble the product. Attach the element from the St. George's ribbon that you have created to the top of the black cross.
- Then you need to add decorative elements in the center.

Brooch for Victory Day using the kanzashi technique.
If you decorate a themed brooch for Victory Day with a flower made using the kanzashi technique, it will also look quite beautiful. To make this craft you will need:
- George Ribbon,
- Satin ribbons in orange and black,
- Glue and decorative elements,
- Scissors, tweezers, and a lighter.
On a note! The process of creating the next brooch is more labor-intensive. Therefore, you are advised to be patient.
Progress:
- The orange and black ribbon must be cut into squares, which will have sides of 5 cm. 7 squares are cut out of the black ribbon, and 14 from the orange ribbon. The sections of the squares must be treated with a flame. As a result, you will prevent shedding.
- Now it’s time to start making the petals. It is recommended to use tweezers. It will be more convenient this way.
- Fold the orange square diagonally into two. The result is a triangle. Fold it in half again.
- Take the opposite corner with your fingers, and cut off the edge that you held with tweezers. The cut is treated with flame.
- Use tweezers to secure the petal. Bend the ribbons in a parallel manner. Treat the cut with fire.
- The black square is folded in exactly the same way as the orange one. It should be attached to the orange square. The result should look like this: Inside the orange blank there should be a black blank. There should be a small leaf in the black blank.
- Sharp corners that were formed behind the tweezers need to be cut off. The edges are processed by fire.
- Form a loop from the St. George ribbon, which will serve as the base. Place the resulting flower on it. Then you can attach the clasp.
On a note! The number of petals per brooch may vary.

How to decorate a brooch made of St. George's ribbon with the colors of the Russian flag.
In this article we list crafts made from kanzashi ribbons for May 9th. To make the next craft, use the following materials:
- St. George's ribbon,
- Satin ribbons in the colors of the Russian flag,
- Beads or rhinestones,
- Scissors, pin, glue,
- Lighter or matches.
Progress:
- Take ribbons in the colors of our flag. Cut them into squares. The length of the sides of these squares should be 5 cm. You should prepare: 2 blue and 2 red squares. Cut 3 pieces from white ribbon.
- Fold each of the squares diagonally, like the brooch we made earlier. Then fold again to create a droplet. Cut off the corner and flame the cut. These manipulations should be carried out with the remaining petals.
- Now start assembling. First, use white petals and connect a couple of elements together at an angle. Secure the ends with glue. Place the third leaf between them. The result is a seven-fold structure. The central petal should protrude upward, above the side petals.
- After which, red and blue petals are glued in pairs.
- Now take the St. George ribbon. Cut a piece from it that will be equal to 20 centimeters. Form a loop. The connection point must be secured with glue. Gently coat the wrong side of the tricolor with glue. Press this element against the front side of the ribbon blank. The corners of the ribbon loop should be cut off and secured with fire.
- Decorate the junction with rhinestones or beads. They must be attached with glue.

Finally
Basically, Victory Day crafts made from kanzashi look like beautiful brooches. Of course, these are not all ideas. And you can find other master classes on the Internet. But in this article we have offered only the simplest ideas to implement, which are quite pleasant to implement with your own hands.
DIY crafts for May 9th- part of the patriotic education of preschoolers, they can be performed at home with parents, older sisters and brothers, in kindergarten in a team with other children. As a rule, in kindergarten, pupils are offered the simplest ideas, for example, a three-dimensional star or several carnations tied with a ribbon. Primary school students also perform the work; a school exhibition is organized specifically for the work created. At school, children already have enough skills in working with various materials, so they can make compositions.
Performing with young children DIY crafts for May 9th, photo Guided by the master class, you introduce the children to the history of the country, its tragic and heroic stories, explain to them the significance of this holiday, so that from early childhood they do not perceive Victory Day as entertainment and celebration, but put great meaning into this national holiday. In addition to children, craftswomen are also busy with creativity on the eve of the holiday; for example, they can make beautiful brooches using the St. George ribbon.
DIY crafts for May 9th
Of course, the most popular option is to make it for the holiday, which you can give to your grandmother. If veterans live on your street, you and your children can congratulate them and bow deeply for their courage and self-sacrifice in the fight for the Motherland.
The picture postcard can be made by children in the senior group of kindergarten; we will use mixed techniques, which involve working with different materials, as well as a different approach. In this case, we will need thick cardboard for the base, for example, gray or light blue, as well as white and yellow colored paper, in addition, you can use red colored paper or red napkins. In progress DIY crafts for May 9th master will use scissors, pencil and PVA glue. For a child, glue must be poured into a small container, for example, into an iron lid, and a brush must be provided for him to work with.
Our card will consist of two parts: a red star and snow-white flowers that resemble apple blossoms. For the red star we will use paper balls and make the petals using the origami technique. Don't worry that origami is too difficult a technique for a child, because in this case we only need to make a few folds to get a curved petal.
Use your fingers to tear off pieces of the red napkin and roll them into balls. We recommend that you first roll out a lot of balls and place them in a bowl, so that you can then glue them along the outline.
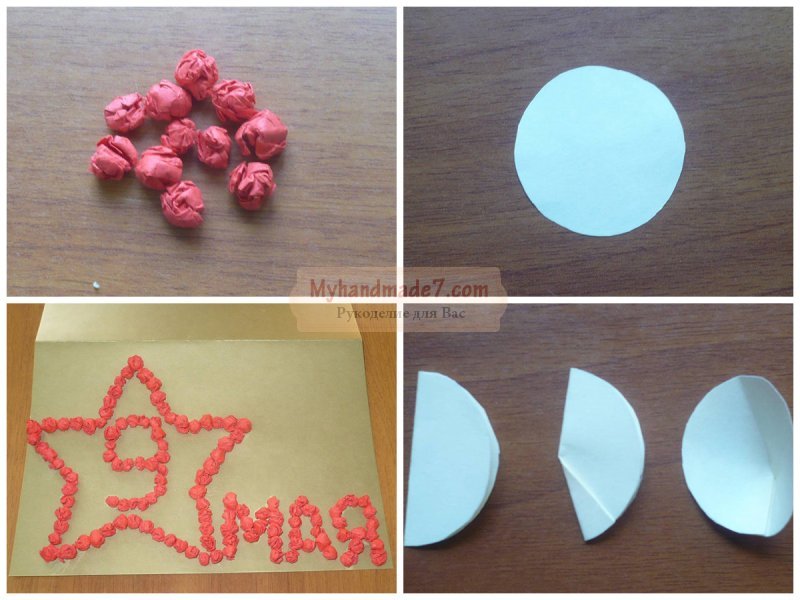
If the child is making a card, then the cardboard should be folded in half and decorated with the front side. With a pencil you need to draw the outline of a star, and inside it the number “9”, next to the word “May”. You need to stick red lumps along this contour, dipping their lower part into glue. While the glue dries, you can work on the petals; for each you need to cut a circle 2.5 cm in diameter. Each flower will consist of five petals, and to decorate the postcard you will need at least three of these flowers.
DIY postcard for May 9th can also be decorated with carnations, which are a symbol of the holiday. In this article we will also tell you how to make a carnation flower using napkins, paper or corrugated paper.
For apple color, we need to fold one circle in half, and from below we bend the corner inward and glue it, now when you open the petal, it will have a curved shape. The petals should be glued overlapping, and the core should be decorated with yellow balls.

DIY “Tank” craft for May 9th
Ideas on how to do it will also come in handy Do-it-yourself voluminous crafts for May 9, which can become part of the composition. You can make a three-dimensional star and make an eternal flame, you can make an airplane by printing templates on a printer and then gluing them, or using corrugated cardboard you can get a real tank. When you and your children do similar crafts, you can tell them about military equipment. This kind of creativity will be especially interesting for boys who are always interested in military topics.

To create the tank, we will use the quilling technique, but we will not create small elements, but only large ones using corrugated cardboard. A primary school student can handle a similar task, and working with corrugated cardboard is a pleasure. To make the tank look realistic, we will choose dark green or gray cardboard. In the process of work we will need a pencil, ruler, scissors, glue. A special tool may also be useful for quilling, but if you don’t have one at hand, you can use a toothpick.

The cardboard must be cut into strips: you will need one strip 2 cm wide, and 10 strips 1 cm wide. All prepared strips must be twisted into a spiral, and the ends must be fixed with glue. As a result, we got wheels for our tank (rollers). One row of rollers on each side will consist of five such spiral wheels, which must be glued together and wrapped in black paper.

A large spiral will be used as a tower, and you also need to twist a tube that will serve as a barrel. To assemble a tank, you need to glue all the parts onto a cardboard square: first the tracks, on top - a tank turret with a muzzle. Then all that remains is to glue the additional elements and draw a star on the tower.
Now you are ready DIY tank for May 9th, if you want it to become part of the composition, then you can make camouflage for it, put small trees and tin soldiers nearby. Preschoolers can try making things out of plasticine.

DIY children's crafts for May 9
The St. George ribbon is one of the main symbols of the Victory Day, so children will definitely use it when creating it. To avoid having to glue a striped ribbon from separate strips of paper, you can use a little trick and print the ribbon template on a printer, then cut it out and glue it. You can also find a ribbon bow template that you can use to decorate a card for a veteran.
The card can be decorated with red carnations, which are created using corrugated paper. The finished flowers are glued to a cardboard base on one side, while the other remains lush, which allows you to create voluminous crafts. In addition to corrugation, you can also use napkins to create carnation buds.
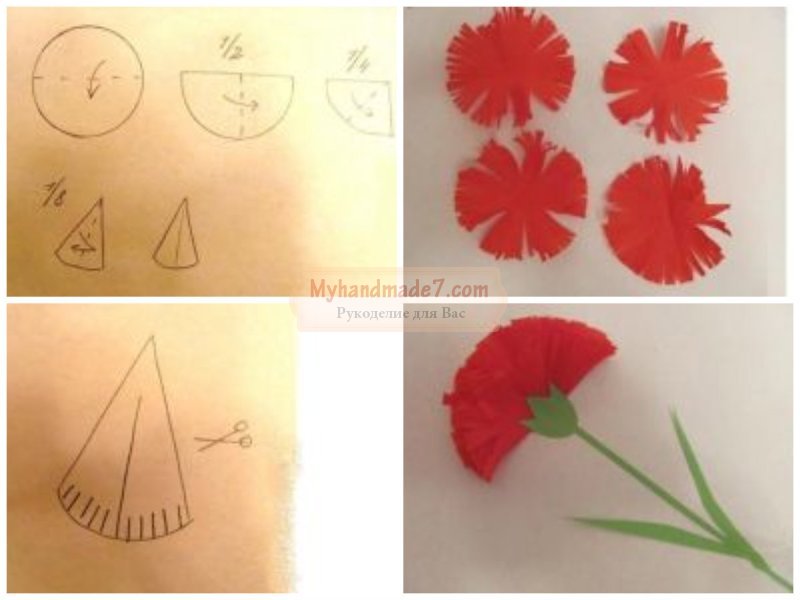
Depending on the size of the flower, we need to cut out circles of the required diameter from the corrugation, and then fold the circles so that as a result only a sector of a different eighth of the circle remains. You can see more details on how to fold a circle in the picture.
To make a craft for May 9th with your own hands, we need to get a voluminous flower, so we need to make many cuts from the edge to the center, just like we make “grass” for children’s appliqués. Then the elements should be unfolded and the fluffy ends should be straightened. Place a little glue in the center of each circle and then fold it in half.
From green colored paper you need to cut out a sepal and a stem with leaves. Form an applique on the cardboard: glue the red bud, stem and sepal. All the flowers should be tied at the bottom with a bow, which should be glued on top of the stems. In addition, the child can draw green stems with a felt-tip pen and write a congratulatory message.

Do-it-yourself voluminous crafts for May 9
For the little ones, you can suggest doing very simple DIY children's crafts for May 9th. Pupils of the younger group of kindergarten find it difficult to work with scissors, so we have prepared an original idea for them - a three-dimensional star that should be decorated with paints.
For the craft, we will need a template, which must be printed in two copies. Each star will consist of two halves. The rays are separated on the star - they should be painted orange and black, alternating them, as shown in the master class.
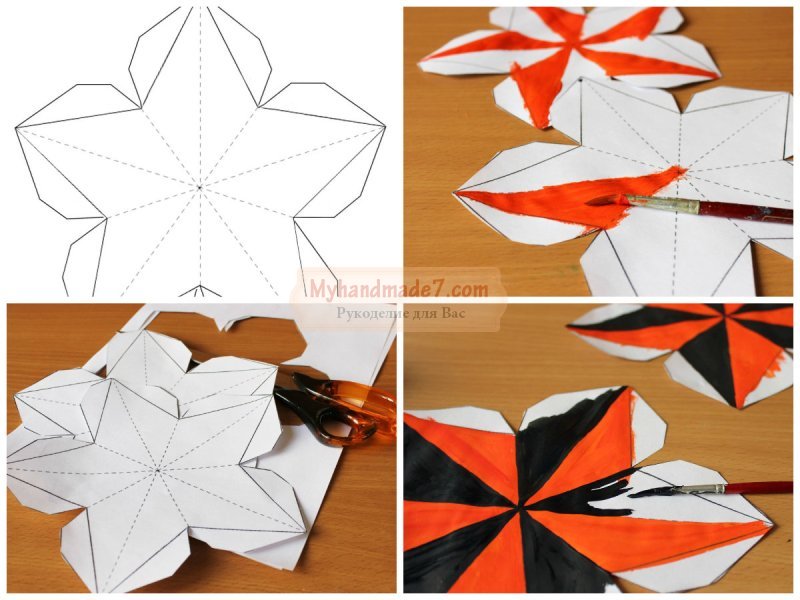
At the end, you need to bend the blanks along the fold lines; you can begin this step after the paint has dried. The two halves should be glued together using PVA glue.
If there is no template, and for an appliqué or composition for a competition you need to make a three-dimensional star, you can use another idea to create it. To do this, you need to use colored paper on which to draw the outline of a six-pointed star with a pencil. We will use one extra ray to make the star three-dimensional. The resulting workpiece must be bent to determine the fold lines separating the rays, then bend all the rays into the center to obtain clear fold lines.
Between the two rays, make a cut to the middle of the workpiece, place one ray on top of the other and glue it together. Now you have a star with a voluminous central part, and its rays should be glued to a cardboard base when creating an applique.

Do-it-yourself original crafts for May 9
If you're wondering what original DIY crafts for May 9th can be made by a real craftswoman, then you should, first of all, pay attention to the St. George’s ribbon, because with its help you can get a beautiful brooch using the kanzashi technique.
At the Victory Day parade, it is customary to attach a St. George's ribbon to a jacket or blouse with a pin, but you can make a beautiful flower, as when working with satin ribbons. You can add the colors of the Russian flag to such a brooch and make it multi-layered. Your friends will be delighted if you present them with such a gift on the occasion of a national holiday.

Even those craftswomen who are not familiar with the kanzashi technique can make DIY crafts for May 9, video will tell you in detail how to form petals correctly. When working with ribbons, it is very important to trim the edges with a lighter so that the threads do not fray. To work, place a candle on the table, first cut the ribbon into squares, then treat its edges with fire, holding the piece with tweezers so as not to get burned. The finished brooch can be glued to a pin.
On the Great Victory Day on May 9, there are many options to express your respect and gratitude to the Heroes of the Second World War, your pride in the Motherland, and patriotism. We bring to your attention various techniques for making fakes that will be a wonderful gift or decoration for May 9th.
On a postcard or poster in the form of an appliqué, you can depict festive and military attributes (). For decoration you can use colored paper, sparkles (sequins), threads. For the background of the application, a printout or newspaper clipping with an article about the surrender of Nazi Germany, the victory of the USSR, war poems or songs with notes may be suitable. Origami crafts always impress with their visual complexity, but in reality everything is simpler than it seems. By May 9, any work can be decorated with stars, as well as entire modules made of paper triangles.Triangular module
To create an element, fold the sheet in half lengthwise, then in half widthwise. Turn the workpiece over, bend the corners to form a triangle (see picture), bend it in half. The element has 2 corners and 2 “pockets”, thanks to which these modules can be assembled into a complex structure. To do this, insert the corners of one part into the “pockets” of another. To make the fake stronger, the joints are secured with glue.
Star element
Cut the paper into strips 1x26 cm. Take one strip, wrap one end in a loop, and tighten slightly. Next, use a long “tail” to wrap the workpiece several times so that you get a regular pentagon. Hide the tip under the strip. Now you need to press on each side of the pentagon so as to form the star itself. From the many such stars you can put any picture in a mosaic; they will greatly decorate your holiday fake.


The basis of the isothread technique is the ability to perform circular and angular filling. Numerous diagrams for isothread are presented on the Internet.


Crafts made from salt dough
Cross stitch, satin stitch, bead embroidery, and basically any method, is a wonderful way to congratulate everyone on the Great Victory. Ribbon decorations using the kanzashi technique () using the St. George ribbon are more relevant than ever on May 9th.
You might also be interested in:

This happened to me on an August night in a small village in the Volgograd region, I...

A costume greeting "Guests from Egypt on a woman's anniversary" is suitable for a birthday girl...

New Year's competitions can be safely “diluted” with outdoor games. Here you can choose...
New Year is a wonderful holiday, at the onset of which everyone expects a miracle, be it a child...

Already know what you will give your child for the New Year? This is cool. We are sure that the gift...

