


Quilling autumn - ideas for crafts
Quilling, or paper rolling, is becoming increasingly popular. To learn quilling you do not need special knowledge and skills. It is enough to try to make simple crafts a few times and soon you will be able to make real masterpieces from paper. Using the quilling technique you can make a wide variety of interesting crafts. Such crafts look very beautiful, original and elegant.
Autumn quilling is the making of various crafts in the form of bouquets of flowers from autumn flowers, beautiful autumn leaves, mushrooms, landscapes, etc. Such crafts will fill the decor of the room with coziness and warmth.
Autumn bouquet using quilling technique
Undoubtedly, the greatest pleasure will come from making various flowers using the quilling technique. An autumn bouquet using the rolling paper technique can lift your spirits in rainy, cold weather.
To make an autumn bouquet you will need:
Special paper for quilling technique;
scissors;
glue;
pencil;
floral wire.

First of all, you need to make several blanks for future autumn flowers. To do this, on the working side of the quilling paper, draw a circle with a diameter of approximately 15-16cm. Then, starting from the outer edge of the circle, cut out the spiral. If the cut lines of the spiral are made a little uneven, the flowers will have a more realistic appearance. The craft will look more interesting if you use paper of different shades and patterns.

Now that the blanks are ready, you can start making buds. To do this, you need to tightly twist the spiral into a bud. If you place a tightly wrapped spiral on the table, the bud will “bloom” before your eyes. In order for the resulting flower to retain its shape, you need to lightly lubricate the central part of the spiral and secure the entire bud to it.

For the leaf you will need green paper, on which you need to draw a leaf, cut it out, fold it like an accordion and also secure the base with glue.

Bend one end of the floral wire, 10-12c long, a little and glue a bud to it, a little lower on the wire glue a few petals. Using the same technology, make several flowers and combine them into a bouquet.


Autumn leaves quilling
Beautiful autumn leaves, made using the rolling paper technique, will fill the interior of the room with autumn colors and will look unusual if you hang them from window cornices.
To make autumn leaves using the quilling technique you will need:
Tweezers for quilling (if you don’t have one, a regular forked toothpick will do);
measuring ruler;
PVA glue;
brush;
quilling paper (preferably double-sided)
pins;
live leaves;
a regular sheet of paper;
cardboard.
The paper must be cut into thin strips. The thickness of the strips may vary, depending on your personal preference. Insert the edge of the resulting strip of paper into the crevice of the tweezers and slowly tightly wind the entire tape onto it, grease the end of the tape with glue, but do not glue it. Insert the tweezers with the wrapped paper into the quilling ruler and release the tweezers. The paper should unwind a little. Using tweezers, press the paper to the end with glue. Leave the workpiece to dry on the ruler. Thus, it is necessary to make a lot of blanks in red, orange and yellow colors.
Maple leaf quilling
A sketch for creating a maple leaf using the rolling paper technique can be found on the Internet, drawn by hand, or used a real maple leaf. The last option is the most interesting. The finished template must be secured to cardboard using pins.
To make the axis of the sheet you will need a strip of quilling paper bent in half. Coat one side with glue and secure it to the template. Leaf veins are made in a similar way. Now you can proceed directly to assembling the craft. Give each mug blank the shape of a droplet, semicircle or oval. By gluing the first figure to the axis or vein of the sheet, you can guess what shape the next part should be. Glue is applied to the figures only at the junctions with the leaf axis, veins or other figures.
To make the finished sheet more durable, you can glue a thin strip of paper around its entire perimeter.


Quilling is one of the best ways to escape from pressing problems and keep yourself busy, and if you involve children in this exciting activity, you can not only have a great time, but also create with your own hands unique fakes or animal figurines that can be decorated by anyone in the future. even the most nondescript interior.
I propose to devote today’s master class to the topic of leaves, which play an important role in any flower arrangement. By following the detailed instructions, you will learn how to make leaves of varying complexity, both free-form and using diagrams and sketches. MKs contain a step-by-step description with pictures, so they are subject to every beginning needlewoman.


Quilling leaves hung from a cornice or wall will add an autumn atmosphere. This way you can create an unusual leaf fall effect in your apartment. To make a maple leaf using the quilling technique, you need to prepare the following materials:
- double-sided paper: colored, office or specialized for rolling paper;
- office glue, ideally PVA;
- template ruler (military ruler with circles);
- safety pins;
- cardboard;
- notebook or landscape sheet of paper;
- toothpick or quilling tool;
- tweezers.
If you don't have specialty paper on hand, simply cut existing colored paper into narrow strips of equal width. You can choose the width arbitrarily, based on personal preferences; usually it ranges around five to eight millimeters.


The material has been collected, let's get to work. Create a variety of blank parts in the stated colors. To do this, twist rolls from existing strips using a toothpick or a special quilling tool. Secure the end of the paper with glue. Place the resulting roll in a circle of medium diameter for further straightening and drying.
Now let's move on to making the template. I’ll now tell you how to make a template for a maple leaf step by step. To get started, print out the sketch below, or draw something similar yourself on a notebook sheet:
Using glue, attach the sketch to the cardboard, and glue tape or any other film over it. It is important! Because, in the worst case, the skeleton of the sheet and its parts will stick tightly to the template:

To make the base of the sheet, fold a strip of paper in half, bend it around a pin previously inserted into the template, coat it with glue and connect it together. Lay out the veins using this principle. Refer to the attached photo.
The leaf skeleton is ready, it’s time to move on to subsequent assembly. Using your fingers, shape each prepared roll into a drop, an oval, or a comma. By gluing one part to the base or vein of the sheet, you will understand what shape you need for the next one.

For greater strength of the leaf, glue a binding strip of paper along the entire contour of the craft, form and secure the tail. Finish the leaf with two pieces at the base of the ponytail.
Video lesson
How to make a sheet of two and three parts
To work you will need:
- paper in three shades of green;
- quilling tool or toothpick;
- officer line;
- PVA glue.
We start by creating simple rolls of different shades, then give them the shape of a comma and a droplet. For a small leaf consisting of three elements, you will need 1 roll in the shape of a drop and 2 in the shape of a comma. Carefully glue all the parts together, the drop roll should be located in the center:


A double leaf is made using the same principle, only rolls in the shape of a comma are used.
Video lesson
Oak leaves quilling
This quilling tutorial is suitable for all beginners, since curling the parts and the general execution of the leaves does not require any special skills. To make oak leaves you will need:
- paper of two colors to choose from: green, brown or yellow;
- glue, preferably PVA;
- tool for rolling strips of paper.
Roll 18 rolls of different sizes from green paper. Leave the rolls to dry in the ruler circles.
Form the central vein of the oak leaf. To do this, fold a strip of yellow paper in half and glue it, then secure it to the cardboard with a pin.

Fold 4 rolls in a semicircle shape. Make 8 teardrop-shaped pieces.


Glue the sheet parts according to the principle shown in the picture. Glue a strip of yellow paper along the contour, and also attach the tail of the sheet.

The oak leaf is ready and can be used as a decoration for various cards and gift boxes or as one of the elements of a garland.
Golden time Autumn– this is certainly the most colorful and vibrant time. However, even such golden landscapes that you and I can watch outside the window cannot drive away autumn sadness and despondency from us. It's rainy and cloudy outside, which means it's time to dive headfirst into your favorite pastime, handicrafts.
There is an incredible number of all kinds of handicrafts that help you create amazingly beautiful things with your own hands: paintings, jewelry, figurines and much more.

In this article, the News Portal “site” has prepared for you magically beautiful works made using the quilling technique (paper rolling). The works are amazing, and you won’t believe that you can create such masterpieces! The quilling technique is so simple that anyone can master it. The main thing here is not to be lazy, to be careful and attentive.
And just as it’s golden autumn outside, we selected creative works using the quilling technique on a current topic.
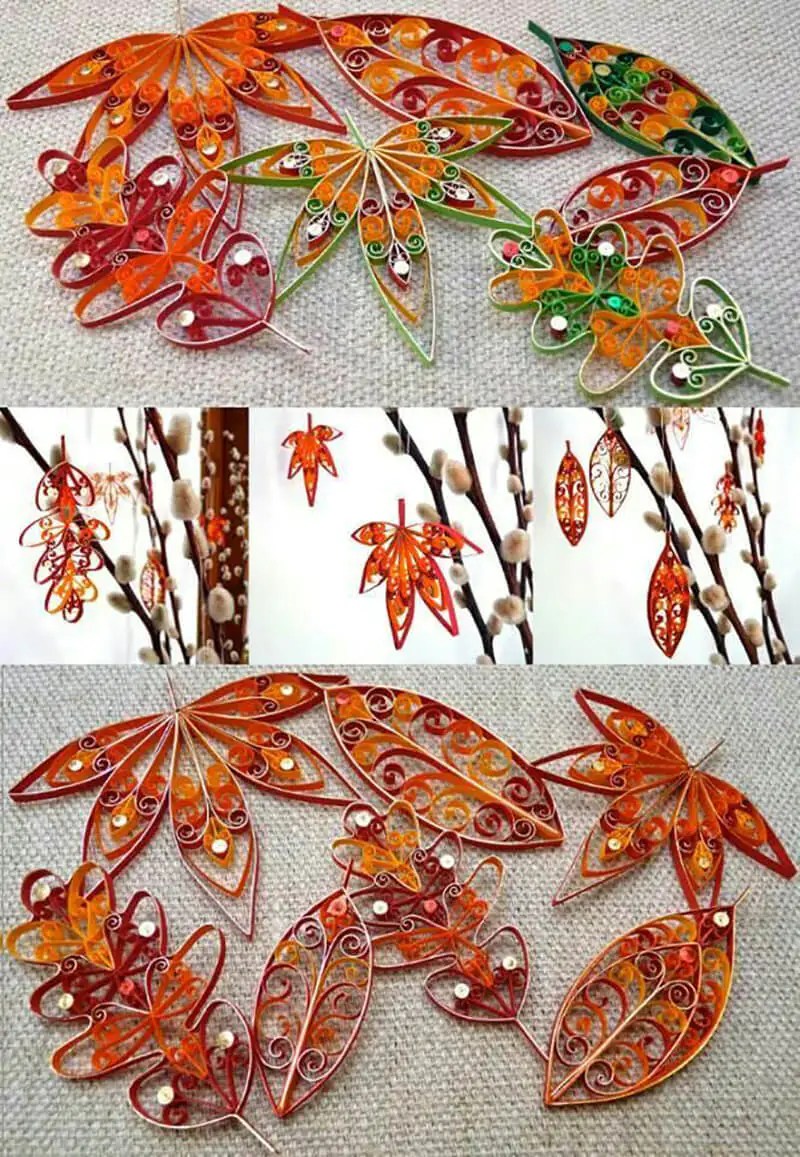
Quilling leaves

So what falls under the Autumn theme? Of course, such bright and magically beautiful autumn leaves. You can place finished leaves made using the quilling technique in frames and hang them on the wall, decorate homemade greeting cards with them, and even, you won’t believe it, leaves made using the quilling technique can become earrings and a pendant!

We bring to your attention several original and beautiful ideas for making autumn leaves using the quilling technique. In fact, the works are not complicated, but you must agree, they are amazingly beautiful.


To create such works, you can use special sets of paper for quilling, or you can cut any decorative paper into identical thin strips yourself.
Maple leaf quilling
Quilling Wood
Quilling Autumn Tree

Autumn means not only the leaves themselves, but also, of course, trees with lush golden crowns. Create voluminous works using the quilling technique and your walls can be decorated with luxurious autumn gardens like these.
Greeting cards decorated with autumn scenes made using the quilling technique will be a wonderful, sophisticated addition to any gift for any occasion in the fall!

Interior paintings and panels on the theme of Autumn will not only decorate your apartment or country house, but also a luxurious gift.

We wish you not boring autumn evenings in the company of paper strips and your limitless imagination!
In any autumn composition, the herbarium appears as one of the main components. It can be purchased, specially decorated, or homemade (fabric or paper). Of course, it’s more pleasant to supplement your work with a paper sheet created with your own hands, made using the quilling technique.
You can use such crafts in the form of wall paintings, pendants on the ceiling or chandelier, table decorations, curtain decor, etc. It all depends only on your imagination.

Today there is a very common misconception that quilling is just a paper rolling technology. In fact, these are ordinary bends of colored paper of any type and size. Let's look at the process of creating simple sheets using this technique. We will need green paper, tweezers and scissors.
First, let's cut out a standard oval shape: take a strip of green paper, fold it along its length and cut it out. We make “accordion” angular bends on them and unfold them to full size. If desired, cut out the corners along the contour. Using the same scheme, you can make a different type of workpiece by cutting the standard one in a circle using curly scissors.


Let's return to the leaves. Making them is not difficult at all: we will need green blanks measuring 0.5 x 15 cm, a stick, glue and scissors. Each package will consist of 3-5 elements. Screw everything onto the stick. From standard curls we create the shape of an eye, a curved drop and a wave.


We glue similar parts together.

If you need less voluminous, but elongated ones, then we connect their elements the way a mountain ash looks like.

If you want to use them as a separate craft, and not a component of a large-scale one, then make its components multi-colored and of unequal size (from larger to smaller).

Let's move on to more complex crafts. We will need a stencil or blank, brown stripes, yellow and orange of all shades, a stick, scissors and glue.
We cut out the base we need and attach it with buttons to the board to secure it.

We take the brown color and “mark” the leaf, forming shoots on it. We glue them with ribs. We form the stem and contours from the same material.


Filling out the maple leaf. This can be done with standard single curls, but we will wind many small ones onto one strip. From the beginning of the segment we make three turns, after a couple of centimeters - three more, and so on until the end of the strip.

Glue the blanks inside the craft. We bend the corners in different directions to create a three-dimensional effect.


Now let's make a maple leaf using standard curls. We take a basis for work (in our case, this is a regular black and white printout).

We trace its contours with a hard, sharp object to press them onto clean paper.

Let's start with the inscription. We take the beige pieces and twist them and give them the appearance of letters. It is advisable to immediately glue the elements onto A4.


Let's create an outline of brown stripes. We make separate sections for each corner and glue them to the base with the edges.

We fill the inner part with multi-colored tightly tightened curls.

Thus, together we created several options for seasonal leaves. As you can see, there are no difficulties in making them, but some will require some work. Quilling leaves are not only elements of pictures, but also independent compositions that you can create as your imagination allows. Imagine and diversify your work, combine different textures and colors - then the result will become a wonderful decoration for your home interior in the form of a wall painting. Good luck.
Video master class
In the last months of autumn, each of us wants to truly feel the season and perhaps even make our own crafts on this theme. Quilling is a great opportunity to use your skills and at the same time practice something new. We suggest you create a seasonal craft in the form of a fallen maple leaf, which is perfect for maintaining the necessary external signs of the season in the interior. Seasonal card - materials We will need special materials:
- Glue will be needed for the blanks
- Strips of paper three millimeters wide
- Quilling tweezers
- Quilling scissors
- Leaf template
Preparing the template  In order to obtain a symmetrical leaf shape, it is necessary to prepare a template. We will choose a “sandwich” shape, which we will make using three pieces of cardboard, which must first be greased with glue. In addition, you need to make a blank drawing of a maple leaf, or copy the required version from the Internet (for example, print it out). Wrap the whole thing on top with tape. In this case, tape is a mandatory option, since otherwise we can get a leaf that will simply be attached to the template. We continue to work
  Using strips of red paper, we select the density of the leaves. It should be in size 130 g. per square meter. We create the skeleton of the future leaf. To firmly secure the product, we use pins. Next, we take a strip 6-12 centimeters in length and recreate the rolls in which we form the shape of an “eye”, “triangle” and “droplet”.
  All the shapes that will be the veins of the leaf will fit on our plate, which we must fill out. The plate must be covered with paper tape. Using ink and a sponge, we tint the sheet, from the middle to the sides, making the tone dark. End of work
  That's it, our preparation is ready! Can be used to decorate our works or the interior of your home!
Comments
Related posts:
Quilling master class. DIY paintings and postcards This master class will teach you how to make beautiful quilling cards with your own hands. This master class will teach you how to make a postcard with your own hands using the quilling technique.
You might also be interested in:
The basis of a beautiful, catchy look is long dark eyelashes that attract attention...

A woman or girl with such a hairstyle could well become the muse of Mikhail Lermontov. IN...

Do you work in the beauty industry? . 11. Concentrated tinted shampoo-conditioner Krasa...

Young women who are planning to have a child are looking forward to the awakening of a new life....
Hello! It's time for the most delicious, original and fun gifts! You won't believe it! But we...

